This post is also available in: Español (Spanish)
Welcome to the Globomatik importer’s user guide
This module is in charge of importing the Globomatik catalog and updating it. It imports the products, manufacturers, categories and images, and keep them updated. When the supplier add new products to the catalog, the module import that product in your shop. When a product become discontinued in the provider catalog, it is deactivated from your shop.
It allows you to choose the desired profit margin using differents types of calculation based on the cost proce, and choose which fields are updated in each process. All this operation is automated through cron tasks programmed in your server.
Connection Data
In the first tab we must enter the credentials of the WebService of Globomatik. You can obtain that data from your personal page in the Globomatik page. Getting the URL of the catalog you can see the user and password.
Also in this section we choose the supplier that will be assigned to the imported products. The module installation process includes the creation of a supplier with the name of Globomatik so that it can be used directly. It does not have to be this one and you can change its name.
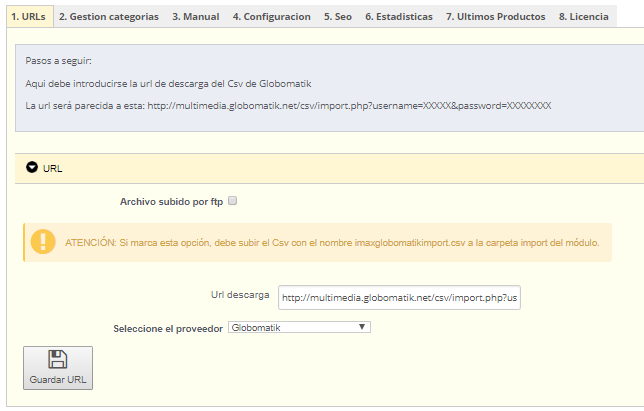
The option “File upload by FTP” allows us to upload the CSV via FTP to the module directory. You had to put it insede the “import” folder located in the “import” folder located inside the module directory. The name of the file must be exactly imaxglobomatikimport.csv
Manage Categories
In the second tab, we can choose the parent category for the imported category tree, the categories to import and the way of calculating prices and margins to apply.
Parent Category
In this section we choose the parent category tree to be imported. This category must be chosen prior to import and changing the selection once the categories have been imported will not change the parent category of the tree.

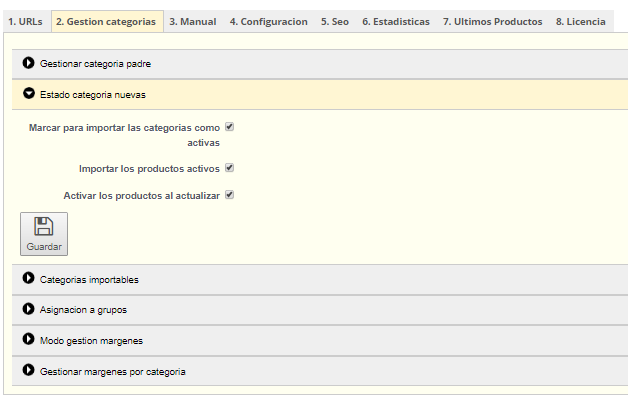
New Categories State
In this section we choose the initial state of the imported categories and products. A deactivated category or product is not visible to users and will not be indexed either. This is useful to keep categories hidden if we don’t want to use the Globomatik category tree, or if we want to work on it before making it visible to the public, and the same for products. The last option, “Enable products on update”, will make the module activate the products when updating them, if it’s unchecked the products will remain deactivated.
Categories to Import
In this section we can choose which of the categories included in the supplier’s cataloge we want to import. For the tree of available categories to be displayed and for us to ba able to choose them, it is necessary to have previously download a file and pre-processed it. To do tis, after configuring the URLs tab, we can use the manual process, in the third tab, until we see the message “The import of precategories hass been completed” or execute in the browser the link of the cron that we have in “Settings” -> “Token Management”. More details in the information on the statistics section.

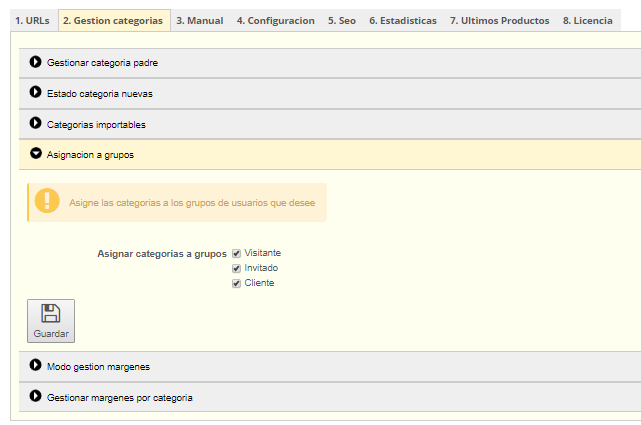
Assignment to Groups
Here you can choose to which groups the imported categories will be assigned. A category that is not assigned to a certain group will be invisible to the users of that group.
Margin Management Mode
In this section we configure the profit margin to be applied to the products. We have several modes to choose from:
Purchase : The margin we choose is applied on the Globomatik purchase price, which the module assigns as the purchase price, wholesale_price.
Selling: the margin is applied using the following formula, [Selling price] = [Purchase price] / [(100 – Margin)/100)].Official price : Globomatik’s recommended retail price, RRP, is used as the selling price. Using this option the margin will not be applied, whatever it is.
Official rate plus margin : Same as the previous option, but in this case the margin is used, on the recommended price.
Minimum amount of profit : The value we put here will be the profit, i.e. the difference between the selling price and the buying price, as long as applying the margin does not reach this amount.
For example, we have a product with a cost of €1 and a margin of 50% on the purchase, with a minimum profit of €1. The resulting selling price would be €1.5 applying the margin, which results in a profit of less than €1, so the profit would be increased to the minimum of €1, resulting in a selling price of €2.
Keep in mind that the margin that is configured is applied to the products when they are updated, changing the margin does not change the price of the products immediately, for a new margin to be applied to all products after changing it is necessary to perform a complete update process. If we have the module configured correctly, with its scheduled tasks, this is automatic and it is not necessary to do anything else but wait.

Manage Margins by Category
In this section we can configure profit margins by category. If there is a margin for a category, this will be applied and not the global one. The default category of the product is used.

Manual processing
In the third tab, Manual, there is a button for manual processing. Each time we use it, a batch of elements of the file will be processed, depending on the batch size configuration we have and the stage of the import. This is equivalent to executing the url of the general cron directly in the browser.

Settings
In the fourth tab, Configuration, we can find the links for the cron tasks, configure the taxes, the size of the process batches, the fields to be synchronised and the status of the products according to their stock.
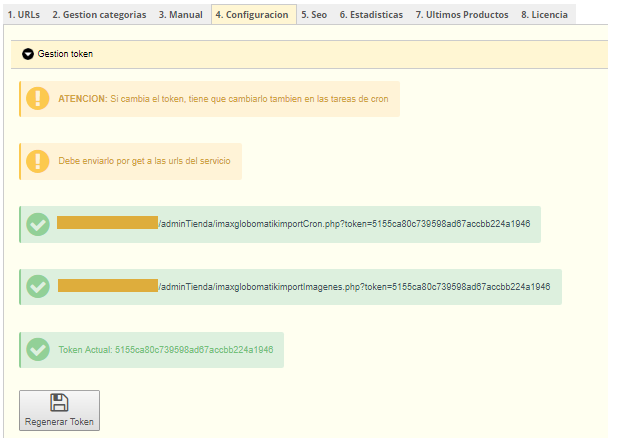
Token Management
In this section we have the links we need to configure the scheduled tasks with which we automate the operation of the module. We have two links, one of them is in charge of importing the images, which is the heaviest part of the import and what will always take the longest time, so they are imported separately. The other link takes care of everything else: preprocessing the file, creating categories, manufacturers and products. Each call to one of these links will process a batch of items of the size chosen in the next section, “Number of items to process”. The type of item to be processed will depend on the stage of the import, which can be seen in the statistics tab of the importer.
The reason for batch processing is to reduce the impact on server resource consumption as much as possible, apart from the fact that it would not be possible to process a whole file in a single process. The smaller the batch size and the higher the frequency of the tasks, the lower the impact on resource consumption.
We recommend setting the tasks with a frequency of once every 5 minutes or something similar, and there would be two tasks, one for each link. The syntax would be like this:
*/5 * * * * curl -f “LINK” ó */5 * * * * wget -qO- “LINK”
The regenerate token button changes the current token to a new random one. This ensures we have control of the links from Prestashop, changing it will stop any cron job already set up, regardless of where it is.
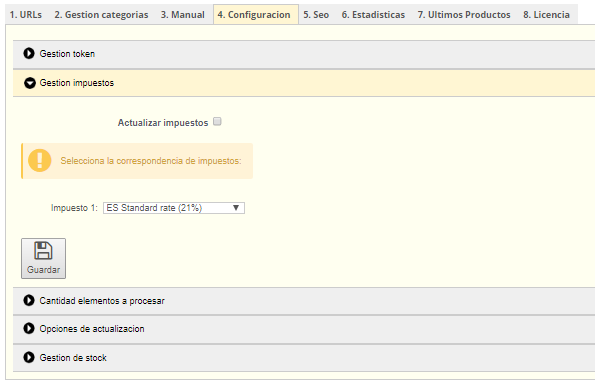
Taxes Management
In this section we choose the tax rule that will be assigned to the imported products when they are created, from the tax rules available in our Prestashop. Checking the box “Update taxes” the module will reassign the selected rule when updating the products, in case we need to change it or we want to make sure that all of them have it.
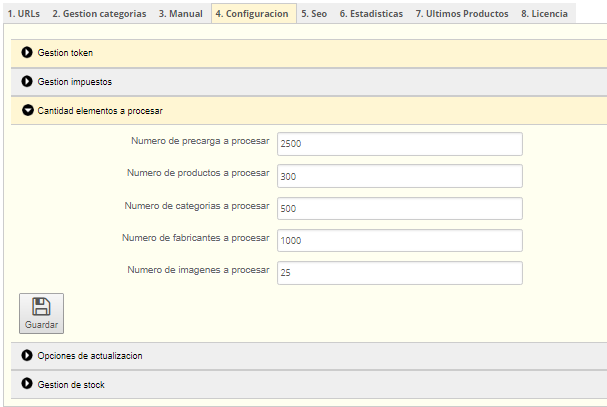
Number of elements to process
This section configures the size of the batches that will be processed each time the cron is run or processed manually. Not all items are processed at the same speed so the batches should be adjusted proportionally, preprocessing the file is much faster than updating products, for example. The speed at which it is processed depends on the server, it is a matter of testing the processing speed and adjusting the batches accordingly.
The following video shows how to calculate the total time of a complete process depending on the batches we schedule.
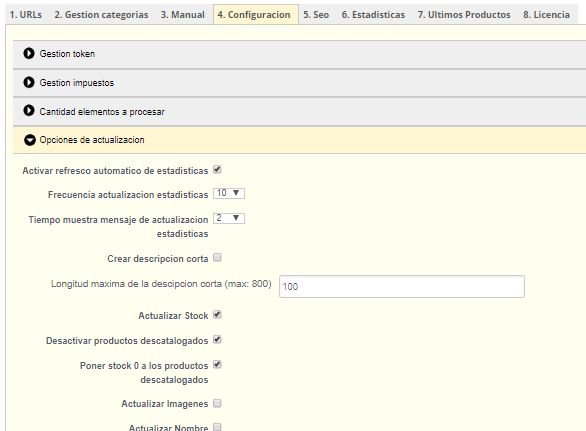
Update Settings
In this section you choose the fields that will be synchronised with those of the file in each update process and some other functionalities. Although it may be tempting to check all the fields to synchronise all this is not a good idea, the more fields you overwrite the slower the processing will be, there are fields that generally do not change so there is no point in overwriting them all the time, and some update options are not meant to be enabled by default.
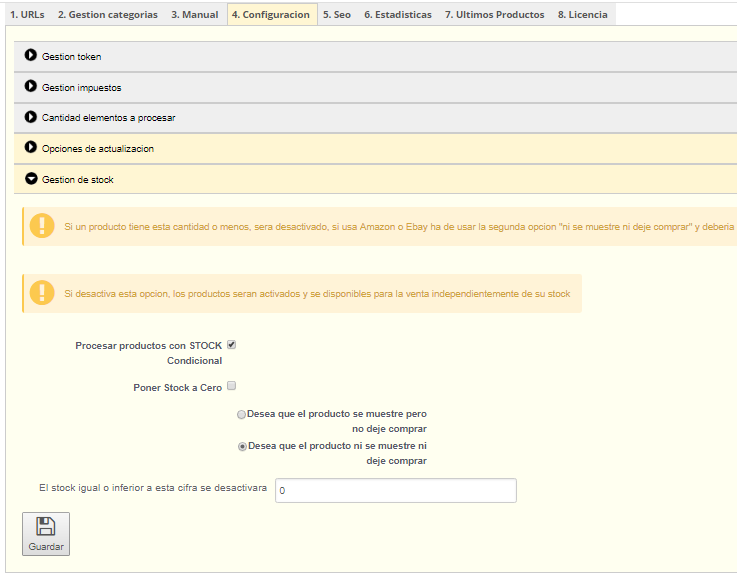
Stock Management
In this section you can choose the status that the module will assign to the products according to their stock.
The first option, “Process products with conditional stock”, enables or disables completely the functions of this section.
In the text field at the bottom, where it says “Stock equal to or less than this figure will be deactivated”, we choose the amount of stock limit on which the other options will be applied.
Checking “Set to stock 0” will set to 0 the stock of the products with stock equal to or less than the one we choose. The option we choose from the selection button will determine whether the products are also deactivated or whether they are only prevented from being purchased by unchecking the option of being available for sale.
SEO Tab
In this section the template to be used to cover the product fields is configured. To do this we have a series of wildcards, which when the product is created will be replaced by the text in the file corresponding to each one. For example, the text [Name] will be replaced by the name of the product in the file to define the name of the product in Prestashop.
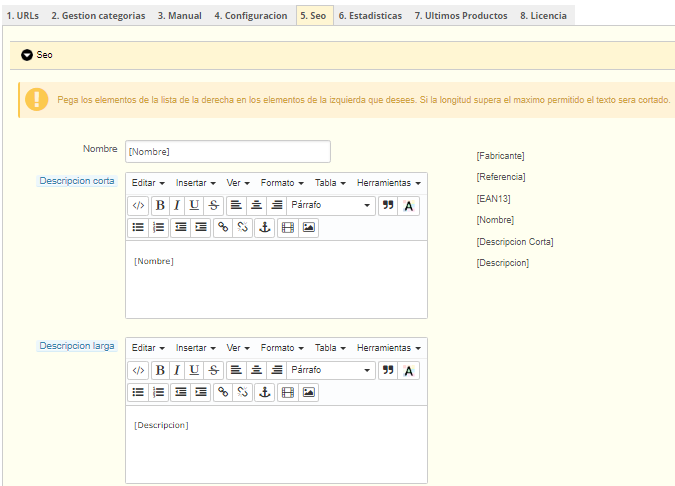
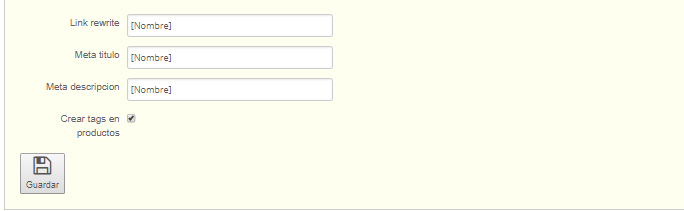
The wildcards can be combined with each other or with the custom text of your choice, what will vary depending on the product will be the wildcards when they are replaced by their corresponding data.
This template will be used when a new product is created. If we change the template and we want the changes to be applied to the products, we must activate the corresponding update options, in Configuration > Update options. Thus, the “Update name” option will overwrite the name field of the products when they are updated following the configuration of this template, for example.
The “Create tags on products” option will create tags for the products, using the manufacturer of the products.
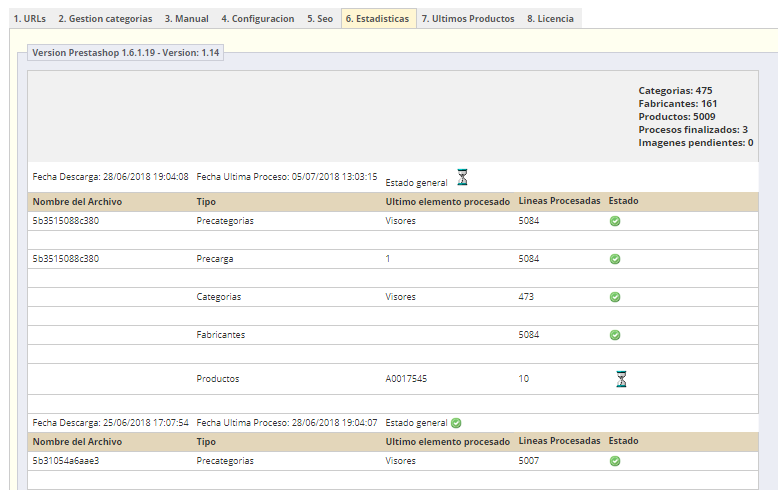
Statistics
In this section we can see information about the import. To do a complete import, a whole process must be done, which we can follow here, that is, that there is a green symbol indicating that it has finished where it says “General status”, and also that the pending images are 0.
The importer always follows the same order: first the file is downloaded, then it is preprocessed and then the elements start to be created, starting with the categories, then the manufacturers and finally the products. The images are imported in a separate process, with their corresponding link that we have in Configuration > Token Management.
If we want to make a partial import of the Globomatik catalogue we need to select the categories we want in the section Categories Management > Importable categories. This section will not show categories to select until the file has been preloaded. To achieve this we have to process several times (depending on the batch size we have configured). Once we have the green completed status symbol in the Precategories phase, the first one, we can refresh the page and go to the importable categories section to select the ones we want.
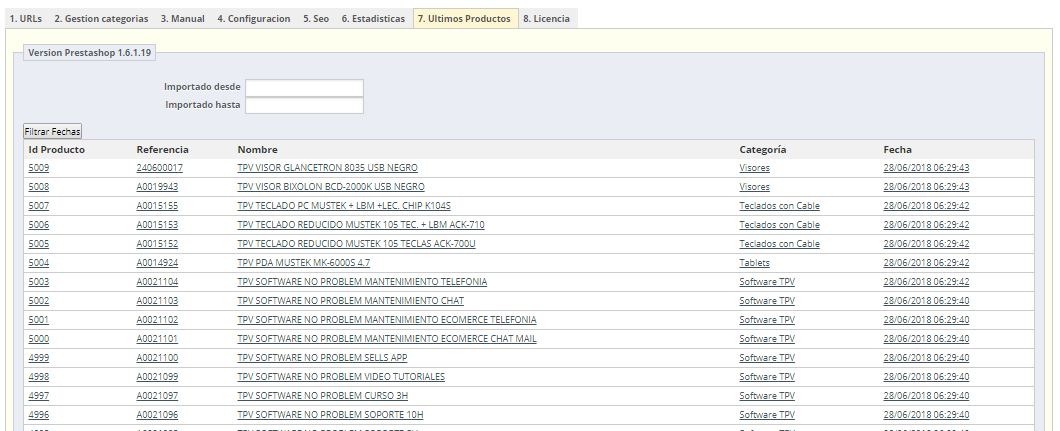
Latest Products
In this section we can control the new products that are imported, defining a date interval.
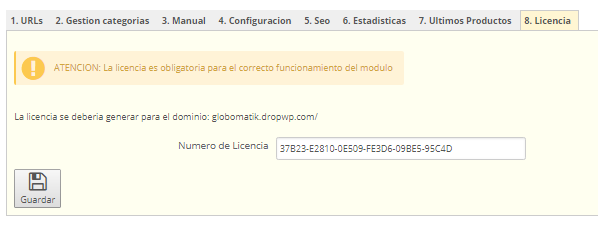
Licence
In this section the licence is entered, and it will be the only configurable section until a valid licence has been entered. The generation of the licence is explained in detail at the beginning of this manual. It must be taken into account that if the domain name is changed, it will be necessary to regenerate the licence in the same way it was generated the first time, but for the new domain.
Again, if you have problems setting up the importer you can ask us for help by opening a ticket at https://tickets.informax.es or by writing an email to soportemodulos@informax.es.